Installation Environment Vmware Workstation pro It is recommended to use the snapshot to store the state of each installation stage to avoid installation failures and causing the installation to start from scratch. Ubuntu 22.04 windows 11 Hardware settings create 3 VM: 4 cores and 4G memory and 100G capacity Before installing K8s (All use the root user) set host: 192.168.47.135 master 192.168.47.131 node1 192.168.47.132 node2 set root ssh connection: sudo su - echo "PermitRootLogin yes" >> /etc/ssh/sshd_config systemctl restart sshd sudo passwd ssh-keygen for i in {master,node1,node2}; do ssh-copy-id root@$i; done set Ipvs and conf create conf file: for i in {master,node1,node2}; do ssh root@$i 'cat << EOF > /etc/modules-load.d/containerd.conf overlay br_netfilter EOF'; done execute conf: for i in {master,node1,node2}; do ssh root@$i 'modprobe overlay;modprobe br_netfilter;'; done create 99-kubernetes-cri.conf file: for i in {maste...
Installation Environment

Vmware Workstation pro
It is recommended to use the snapshot to store the state of each installation stage to avoid installation failures and causing the installation to start from scratch.
Ubuntu 22.04
windows 11
Hardware settings
create 3 VM:
4 cores and 4G memory and 100G capacity
Before installing K8s (All use the root user)
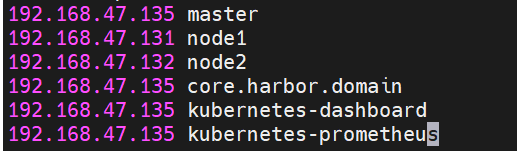
set host:
192.168.47.135 master
192.168.47.131 node1
192.168.47.132 node2
set root ssh connection:
sudo su -
echo "PermitRootLogin yes" >> /etc/ssh/sshd_config
systemctl restart sshd
sudo passwd
ssh-keygen
for i in {master,node1,node2}; do ssh-copy-id root@$i; done
set Ipvs and conf
create conf file:
for i in {master,node1,node2}; do ssh root@$i 'cat << EOF > /etc/modules-load.d/containerd.conf
overlay
br_netfilter
EOF'; done
execute conf:
for i in {master,node1,node2}; do ssh root@$i 'modprobe overlay;modprobe br_netfilter;'; done
create 99-kubernetes-cri.conf file:
for i in {master,node1,node2}; do ssh root@$i 'cat << EOF > /etc/sysctl.d/99-kubernetes-cri.conf
net.bridge.bridge-nf-call-ip6tables = 1
net.bridge.bridge-nf-call-iptables = 1
net.ipv4.ip_forward = 1
user.max_user_namespaces=28633
EOF'; done
execute conf:
for i in {master,node1,node2}; do ssh root@$i 'sysctl -p /etc/sysctl.d/99-kubernetes-cri.conf;'; done
create ipvs.conf file:
for i in {master,node1,node2}; do ssh root@$i 'cat > /etc/modules-load.d/ipvs.conf <<EOF
ip_vs
ip_vs_rr
ip_vs_wrr
ip_vs_sh
EOF'; done
execute conf:
for i in {master,node1,node2}; do ssh root@$i 'modprobe ip_vs;modprobe ip_vs_rr;modprobe ip_vs_wrr;modprobe ip_vs_sh;'; done
use the command to check whether the required core modules have been loaded correctly:
lsmod | grep -e ip_vs -e nf_conntrack

install ipvsadm
for i in {master,node1,node2}; do ssh root@$i 'apt install -y ipset ipvsadm'; done
install containerd
for i in {master,node1,node2}; do ssh root@$i 'wget https://github.com/containerd/containerd/releases/download/v1.6.8/containerd-1.6.8-linux-amd64.tar.gz'; done
for i in {master,node1,node2}; do ssh root@$i 'tar Cxzvf /usr/local/ containerd-1.6.8-linux-amd64.tar.gz'; done
check status
containerd -version
install runc
for i in {master,node1,node2}; do ssh root@$i 'wget https://github.com/opencontainers/runc/releases/download/v1.1.9/runc.amd64'; done
for i in {master,node1,node2}; do ssh root@$i 'install -m 755 runc.amd64 /usr/local/sbin/runc'; done
set contained setting:
for i in {master,node1,node2}; do ssh root@$i 'mkdir -p /etc/containerd;containerd config default > /etc/containerd/config.toml'; done
update /etc/containerd/config.toml on all nodes:
set SystemdCgroup = true

To start containerd for systemd, you need to set /etc/systemd/system/containerd.service:
for i in {master,node1,node2}; do ssh root@$i 'cat << EOF > /etc/systemd/system/containerd.service
[Unit]
Description=containerd container runtime
Documentation=https://containerd.io
After=network.target local-fs.target
[Service]
#uncomment to enable the experimental sbservice (sandboxed) version of containerd/cri integration
#Environment="ENABLE_CRI_SANDBOXES=sandboxed"
ExecStartPre=-/sbin/modprobe overlay
ExecStart=/usr/local/bin/containerd
Type=notify
Delegate=yes
KillMode=process
Restart=always
RestartSec=5
# Having non-zero Limit*s causes performance problems due to accounting overhead
# in the kernel. We recommend using cgroups to do container-local accounting.
LimitNPROC=infinity
LimitCORE=infinity
LimitNOFILE=infinity
# Comment TasksMax if your systemd version does not supports it.
# Only systemd 226 and above support this version.
TasksMax=infinity
OOMScoreAdjust=-999
[Install]
WantedBy=multi-user.target
EOF'; done
start containerd:
for i in {master,node1,node2}; do ssh root@$i 'systemctl daemon-reload;systemctl enable containerd --now ; systemctl status containerd;'; done
install nerdctl:
for i in {master,node1,node2}; do ssh root@$i 'wget https://github.com/containerd/nerdctl/releases/download/v0.23.0/nerdctl-0.23.0-linux-amd64.tar.gz;mkdir -p /usr/local/containerd/bin/ && tar -zxvf nerdctl-0.23.0-linux-amd64.tar.gz nerdctl && mv nerdctl /usr/local/containerd/bin/;ln -s /usr/local/containerd/bin/nerdctl /usr/local/bin/nerdctl;'; done
check version:
nerdctl version
take the snapshot before you start to install k8s.
install Kubernetes with kubeadm
install kubeadm and kubelet (exec on all nodes)
apt-get update
apt-get install -y apt-transport-https ca-certificates curl
curl -s https://mirrors.aliyun.com/kubernetes/apt/doc/apt-key.gpg | sudo apt-key add -
tee /etc/apt/sources.list.d/kubernetes.list <<-'EOF'
deb https://mirrors.aliyun.com/kubernetes/apt/ kubernetes-xenial main
EOF
apt-get update
apt install kubelet kubeadm kubectl
apt-mark hold kubelet kubeadm kubectl
turn off swap
for i in {master,node1,node2}; do ssh root@$i 'swapoff -a;'; done
update /etc/sysctl.d/99-kubernetes-cri.conf on all nodes
vm.swappiness=0

for i in {master,node1,node2}; do ssh root@$i 'sysctl -p /etc/sysctl.d/99-kubernetes-cri.conf;'; done
init the cluster with kubeadm
start the service
for i in {master,node1,node2}; do ssh root@$i 'systemctl enable kubelet.service;'; done
check the config with this command:
kubeadm config print init-defaults --component-configs KubeletConfiguration
add kubeadm.yaml on all nodes
update advertiseAddress to your master node's ip
sources :
https://github.com/CloseSu/K8S-install-on-VM/blob/main/install%20k8s/kubeadm.yaml
pull the images
for i in {master,node1,node2}; do ssh root@$i 'kubeadm config images pull --config kubeadm.yaml;'; done
init master node
kubeadm init --config kubeadm.yaml
Access the cluster according to commands

edit .bashrc
export KUBECONFIG=/etc/kubernetes/admin.conf
source ~/.bashrc
use the command to join the cluster:

install helm on master node
wget https://get.helm.sh/helm-v3.12.3-linux-amd64.tar.gz
tar -zxvf helm-v3.12.3-linux-amd64.tar.gz
install -m 755 linux-amd64/helm /usr/local/bin/helm
install calico
wget https://github.com/projectcalico/calico/releases/download/v3.26.1/tigera-operator-v3.26.1.tgz
use custom values.yaml to install calico
sources :
https://github.com/CloseSu/K8S-install-on-VM/blob/main/calico-values.yaml
helm install calico tigera-operator-v3.26.1.tgz -n kube-system --create-namespace -f calico-values.yaml
check the status until running
kubectl get pod -n kube-system | grep tigera-operator
kubectl get pods -n calico-system
install calico plugin
cd /usr/local/bin
curl -o kubectl-calico -O -L "https://github.com/projectcalico/calicoctl/releases/download/v3.21.5/calicoctl-linux-amd64"
chmod +x kubectl-calico
Verify that the plugin is working properly:
kubectl calico -h

test k8s dns
kubectl run curl --image=radial/busyboxplus:curl -itnslookup kubernetes.default

kubectl delete pod curl
install ingress-ngnix
add helm repo and download
helm repo add ingress-nginx https://kubernetes.github.io/ingress-nginx
helm repo update
helm pull ingress-nginx/ingress-nginx
tar xvf ingress-nginx-4.10.1.tgz
cd ingress-nginx
update values.yaml
hostNetwork: true

dnsPolicy: ClusterFirstWithHostNet
add ingress: "true"
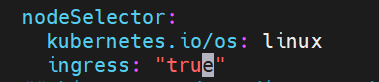
kind: DaemonSet
install ingress-nginx
kubectl create ns ingress-nginx
helm install ingress-nginx -n ingress-nginx .
label node master and deploy pod
kubectl label node master ingress=true
kubectl taint node master node-role.kubernetes.io/master-
check pods and node
kubectl get all -n ingress-nginx

kubectl get pods -n ingress-nginx -o wide

take the snapshot before you start to install other module.
install local storageClass
reference:
https://github.com/rancher/local-path-provisioner
kubectl apply -f https://raw.githubusercontent.com/rancher/local-path-provisioner/master/deploy/local-path-storage.yaml
install Harbor
download harbor
helm repo add harbor https://helm.goharbor.io
helm pull harbor/harbor --version 1.11.0
tar xvf harbor-1.11.0.tgz
cd harbor/
edit values.yaml
update all storageClass with local-path

ingress.className = nginx

update password if you need, or use default
helm install harbor . -f values.yaml --namespace harbor --create-namespace
check status
kubectl get pod -n harbor

enter web
https://kubernetes-harbor
admin / Harbor12345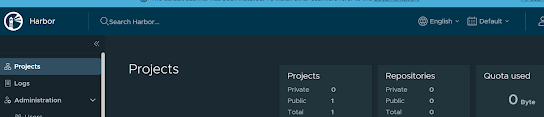
edit config /etc/containerd/config.toml on all nodes
[plugins."io.containerd.grpc.v1.cri".registry.configs."core.harbor.domain".tls]
insecure_skip_verify = true
[plugins."io.containerd.grpc.v1.cri".registry.configs."core.harbor.domain".auth]
username = "admin"
password = "Harbor12345"

edit /etc/hosts on all nodes
for i in {master,node1,node2}; do ssh root@$i 'echo "192.168.47.135 core.harbor.domain" >> /etc/hosts'; done
restart contained on all nodes
service containerd restart
inner login
nerdctl login -u admin --insecure-registry core.harbor.domain
Harbor12345


if you see this error
run:
export KUBECONFIG=/etc/kubernetes/admin.conf
source ~/.bashrc
download file and install
wget https://raw.githubusercontent.com/kubernetes/dashboard/v2.7.0/aio/deploy/recommended.yaml
kubectl apply -f recommended.yaml
check pods
kubectl get pod -n kubernetes-dashboard
create user
sources :
https://github.com/CloseSu/K8S-install-on-VM/blob/main/dashboard/admin-user.yml
kubectl apply -f admin-user.yml
create secret
sources:
https://github.com/CloseSu/K8S-install-on-VM/blob/main/dashboard/admin-user-secret.yaml
kubectl apply -f admin-user-secret.yaml
get token
kubectl get secret admin-user-secret -n kubernetes-dashboard -o jsonpath={".data.token"} | base64 -d
install ingress
source:
https://github.com/CloseSu/K8S-install-on-VM/blob/main/dashboard/ingress.yaml
kubectl apply -f ingress.yaml
edit your /etc/hosts
192.168.47.135 kubernetes-dashboard

if you are Windows, also edit Windows/System32/drivers/etc/hosts with the same value
enter dashboard with token
https://kubernetes-dashboard

Install prometheus Stack
pull helm charts
helm repo add prometheus-community https://prometheus-community.github.io/helm-charts
helm repo update
helm pull prometheus-community/kube-prometheus-stack
tar xvf kube-prometheus-stack-60.0.2.tgz
cd kube-prometheus-stack
edit values
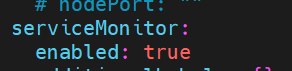
podMonitorSelectorNilUsesHelmValues: false
serviceMonitorSelectorNilUsesHelmValues: false
helm install prometheus prometheus-community/kube-prometheus-stack --namespace prometheus --create-namespace -f values.yaml
install prometheus ingress
source:
https://github.com/CloseSu/K8S-install-on-VM/blob/main/prometheus/prometheus-ingress.yaml
kubectl apply -f prometheus-ingress.yaml
edit your /etc/hosts
192.168.47.135 kubernetes-prometheus
https://kubernetes-prometheus

install grafana ingress
source:
https://github.com/CloseSu/K8S-install-on-VM/blob/main/prometheus/grafana-ingress.yaml
kubectl apply -f grafana-ingress.yaml
edit your /etc/hosts
192.168.47.135 kubernetes-grafana

get password
kubectl get secret --namespace prometheus prometheus-grafana -o jsonpath="{.data.admin-password}" | base64 --decode ; echo;
# prom-operator
enter the web
https://kubernetes-grafana
admin / prom-operator

add ingress-nginx dashboard
update values.yaml in ingress-nginx directorymetrics.enabled = true

serviceMonitor.enabled = true
update ingress-nginx
helm upgrade -f values.yaml ingress-nginx -n ingress-nginx .
import dashboard id: 9614
source: prometheus

Spring Boot intergration
install mysql
download mysql
helm repo add bitnami https://charts.bitnami.com/bitnami
helm pull bitnami/mysql
tar xvf mysql-11.1.2.tgz
cd mysql/
edit values.yaml
global.storage = local-path
rootPassword = 123456
database = demo
username = roots
password = password

metric = true

serviceMonitor = true

install
kubectl create ns storage
helm install mysql -f values.yaml . -n storage
check status
kubectl get pods -n storage
kubectl exec -ti mysql-0 -n storage -- /bin/sh
mysql -u roots -ppassword
show databases;

import to grafana
import dashboard id 7362
source: prometheus
source: prometheus

install redis
download redis
helm pull bitnami/redis
tar xvf redis-19.5.2.tgz
cd redis/
edit values.yaml
storageClass = local-path
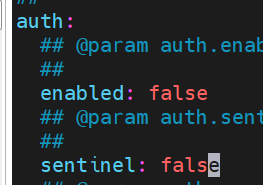
auth.enable = fasle
sentinel = false
tls.authClients = false

metric.enable = true
serviceMonitor.enabled = true

architecture = standalone

install
helm install redis -f values.yaml . -n storage
check status
kubectl get pods -n storage
import to grafana
import dashboard id 11835
source: prometheus
source: prometheus

install zookeeper
download zookeeper
helm pull bitnami/zookeeper
tar xvf zookeeper-13.4.3.tgz
cd zookeeper/
edit values.yaml
storageClass = local-path
metric.enable = true
serviceMonitor.enabled = true
install
helm install zookeeper -f values.yaml . -n storage
check status
kubectl get pods -n storage

import to grafana
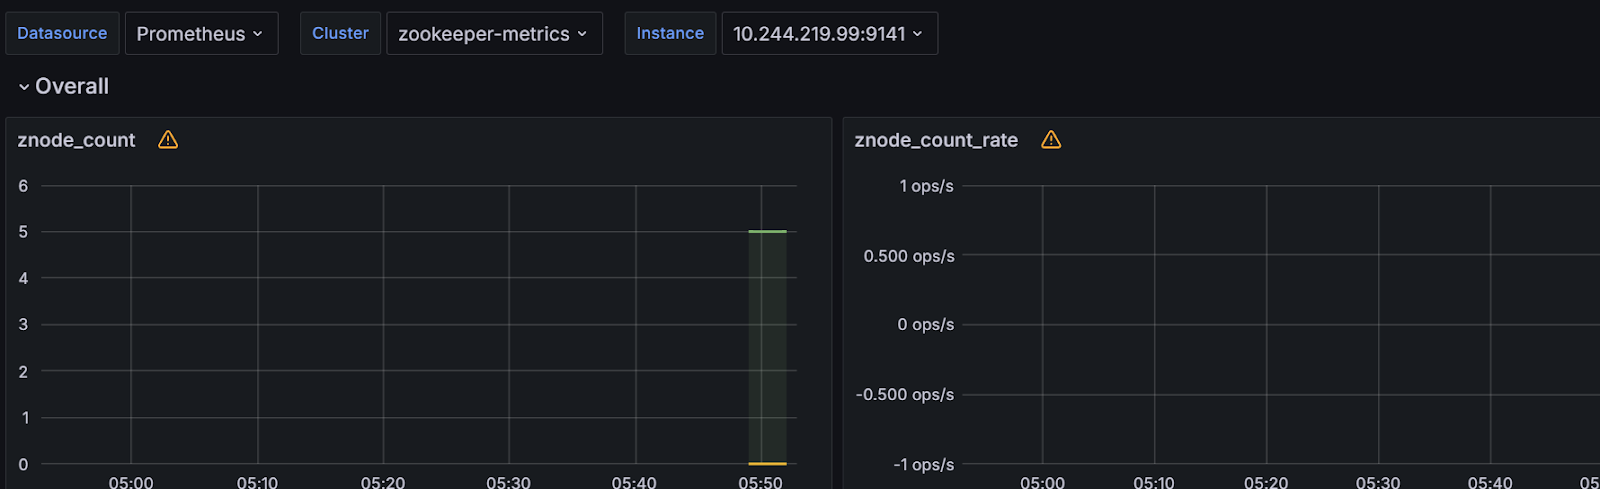
import dashboard id 10465
source: prometheus
source: prometheus
install kafka
download kafka
helm pull bitnami/kafka
tar xvf kafka-29.2.4.tgz
cd kafka/
edit values.yaml
storageClass = local-path
client.password = 123456

controller.replicaCount = 0

broker.replicaCount =3

externalZookeeper.servers = [zookeeper.storage]

provisioning.numPartitions = 2
provisioning.replicationFactor = 2

metric.enable = true
serviceMonitor.enabled = true
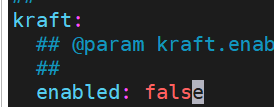
kraft = false
install
helm install kafka -f values.yaml . -n storage
security config this will be used in spring boot

check status
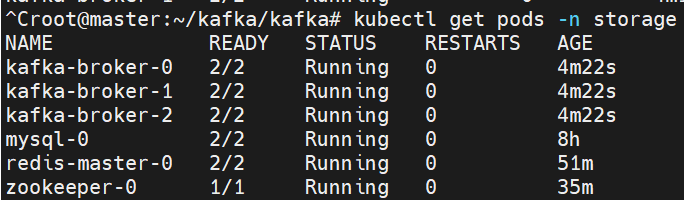
kubectl get pods -n storage
import to grafana
import dashboard id 12483
source: prometheus
source: prometheus

Spring boot install
source:
https://github.com/CloseSu/springbootDocker
cd springbootDocker/
edit files
edit src/main/docker/depolyment.yaml
edit image source from harbor domain

test build image
source:
https://github.com/CloseSu/springbootDocker
cd springbootDocker/
nerdctl build -t kubernetes-harbor/library/test-docker:0.0.1 -f src/main/docker/Dockerfile .
if you see this error ,install buildctl
for i in {master,node1,node2}; do ssh root@$i 'wget https://github.com/moby/buildkit/releases/download/v0.10.4/buildkit-v0.10.4.linux-amd64.tar.gz;tar -zxvf buildkit-v0.10.4.linux-amd64.tar.gz -C /usr/local/containerd/;ln -s /usr/local/containerd/bin/buildkitd /usr/local/bin/buildkitd;ln -s /usr/local/containerd/bin/buildctl /usr/local/bin/buildctl'; done
add file on /etc/systemd/system/buildkit.service on all nodes
source:
https://github.com/CloseSu/K8S-install-on-VM/blob/main/buildkit/buildkit.service
systemctl daemon-reload
systemctl enable buildkit --now
systemctl status buildkit

check status
nerdctl version
and build again and push
cd springbootDocker/
nerdctl build -t core.harbor.domain/demo/test-docker:0.0.1 -f src/main/docker/Dockerfile .
nerdctl push --insecure-registry core.harbor.domain/demo/test-docker:0.0.1
deploy application
kubectl apply -f src/main/docker/depolyment.yaml
kubectl apply -f src/main/docker/service.yaml
kubectl apply -f src/main/docker/ingress.yaml
kubectl apply -f src/main/docker/monitor.yaml
edit /etc/hosts

test on web and check log
https://myservice.com/basic/test/getTestMsg
kubectl get pods
grafana dashboard 10280

留言
張貼留言